Background
I subscribe to an ezine called Woodworkers Journal because it is free and they have some interesting articles. They have a magazine by the same name. In early June they headlined with a contest for amateur woodturners.
It's a Contest! Turn, Turn, Turn!
Issue: Issue 302
Posted Date: 6/5/2012
 Are you a woodturner? Have your thoughts ever turned to fame and/or fortune? If they have, well you are in luck.As most of you know, Woodworker's Journal also has a print magazine, and, for this year's September/October issue, we are going to select four amateur woodturners to create a bowl from similar blocks of wood. All four turners will be featured in the print issue (fame!), and three will get a $100 gift certificate to Rockler Woodworking and Hardware (fortune!). The winner (the fourth contestant) will get a $150 certificate (even more fortune!).So, where will these woodturners come from, and how can you get in on the action? I am glad you asked! The woodturners to be featured in the print magazine will come from ... drumroll, please ... among our eZine readers! (I know, we're combining our media. Call me crazy. Wait a minute ...) Simply click here and fill out the entry form. From the entries we receive in the next seven days, we will select four contestants.
That's it. If you are selected, we'll send you a block of wood ... you'll turn a bowl, and send it back to us.
So click and sign up. You've only got seven days from today!
Rob Johnstone, Woodworker's Journal
All you have to do
is fill out a form online. I thought, What the heck? and put my name in. On Friday June 15 I found a package on my porch,
an 8 x 8 x 3" block of myrtle. There was a letter inside that stated I am one of 4 woodturners chosen to compete and I have until June 26 to finish. A photographer will be contacting me for pictures of ME in MY SHOP for the magazine! Thoughts rush through my head ...... YAY! What should I make? OH SHIT I go on vacation on the 21st can I do it and have the photographer here before I leave? Did I get in over my head? It's a Contest! Turn, Turn, Turn!
Issue: Issue 302
Posted Date: 6/5/2012
Posted Date: 6/5/2012
I emailed Rob Johnson and asked if there was time before my trip or do I needed to send my wood back. He said that he could get the photographer there and we should be ok. Wow. Now I have to make something.
 |
| The start of a branch on the top edge. |
 |
| Sap wood (near the bark) to the left and heartwood to the right. |
The Wooden Block
The block was nearly quarter sawn with the almost white sapwood on one side and nicely colored heartwood on the other. The grain ran mostly parallel to the short side (quarter sawn ) except for part of the heartwood side that had small growth rings in the corner nearing the pith or center of the log. There was a small circle in this section that was the start of a branch within the log.
What to make?
My first thought is always how big a bowl can it be and how can I get the most character from the wood. For maximum character I would use the change in character near the center of the log and use the branch as interest. But as I thought about the limited time, I would have to turn this once and let it dry and hope that it didn't distort too badly. I chose to avoid the center and turn that away to avoid too much drying distortion. If I had time and another piece of wood I would try for character but I will still try and make the largest bowl I can. Note my "thought scratches" in the wax in the picture below.
 |
| Note the grain, especially in the upper left as it gets closer to the center of the log. |
Process
The biggest thing you have to think about in woodturning is how will you hold the wood so that it is secure and you are able to access the angles you need to make the cuts. After years of turning I have my usual style that has been developed from tools that I have and how safe I feel with the wood spinning at speed. Since I have decided where the hollow part of the bowl will be I can screw a small faceplate in the center and bring up the tailstock for more security.
 |
| Block attached to the lathe with a faceplate. |
The block was sealed with wax to slow drying and when I started cutting I noticed that is was still pretty wet. I try to turn the best curve I can. This is where I have issues with my skills in making a constant curve and have it look good. I did OK on this curve but it was a struggle. While turning the outside of the bowl, an oval design emerged from where the grain turned toward the center of the log.
I turned a thin tenon on the base with the roughed base slightly larger than the tenon for my chuck to rest on.
 |
| Still on the faceplate with tenon ready for the faceplate. |
 |
| Tenon put in the chuck for hollowing out the bowl. |
 |
| Move tailstock up for safety. |
I the put the bowl in the chuck and turned the inside. I kept the side fairly thick to be on the safe side on a one-chance-only piece of wood. I sanded from 150 grit to 400 grit with some sanding sealer to try and help with the wet wood. I decided that since it might move as it dries I would burn some rings around the rim. This shows that the rim was round at one time if it moves. I stopped at 2 lines because that looked right.
 |
| During the hollowing of the inside. |
I let it dry for the night and not much happened. I was running out of time so I decided to turn the base. I used a donut chuck to secure the bowl and make a nice base. I centered the bowl with the tailstock in the hole I used at the start. I made the base thinner and concave with 2 circles for decoration and room for my initials. I sanded the base, removed it from the donut, cleaned up the donut marks and let it dry for about 24 hrs. I know that is not long enough to dry but I am constrained by time.
 |
| Using the tailstock hole in the base, I center the bowl and secure it. |
 |
| Donut chuck from the side. Burn lines visible. |
 |
| Base is turned down, sanded, and decorated. |
Finishing
I wanted to try and do something easy and quick to finish it. I had been experimenting with walnut oil and it makes the grain pop. So I put a coat on it and let it sit. The next day I wiped it down and rubbed it in and let it sit and dry for another day. I would buff it out with carnauba wax before it ships out.
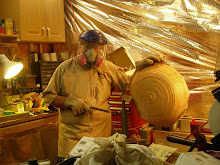
While waiting I cleaned up the shop to prepare for my photo session. My shop is so small and packed with junk that the only way to be seen while turning is to turn the headstock 90 degrees to the bed. I pulled out a large dry maple bowl and trued it to see if I can get shavings flying on command.
Wednesday My Final Day
As my daughter can attest, I was pretty anxious. 10 am came and Donna Chiarelli promptly showed up for my photo shoot. It went smoothly and I hope she can photoshop my waistline! Love a professional with the right tools and a clear plan. |
| Just after the photo shoot, she brought her background to hopefully catch chips flying. |
 |
| Here is Donna with pole for one light and a small part of the other one. |
 |
| Sap wood. |
 |
| Profile with burnt rings. |
 |
| Character from the oval formed by getting closer to the center of the log. |
 |
| Base detail. |
 |
| Quarter sawn grain patterns. |
 |
| Outside oval pattern. |
It was a hot day so as I was shooting the bowl it started to cry....literally water was beading up, straight from the grain. It was mostly from the sap wood, which makes sense since that is where most of the water flows in the tree. I decided that this would be good to try and get the water out, so I left it out in the sun and checked in on it often and cleaned the water off.
 |
| Did not think to document the crying until the end with just a few drops. |
 |
| Here you can see a few more drops. |
After about an hour, it stopped weeping and I pulled it in and cleaned it off, let it cool some, and boxed it up. Used their FedEx label, and off to Parcel Plus with fingers crossed that all goes well and it shows well. I doubt I will win but think I won by completing the project.
Tim, I think this is amazing, and I thing you underestimate your skills. I think this bowl is beautiful, and I am constantly amazed by the pieces you create. You're right--it's an honor to be picked, and I cannot believe you got this all finished before you left on vacation. I think you're crazier than I am!
ReplyDeleteGood luck. Can't wait to hear how it turns out!